Showing posts with label workshop. Show all posts

Tuesday, May 25, 2010

Workshop 8 - Deploy and Distribute Blackberry Applications

How to Deploy Applications

There are different ways to deploy a Blackberry applications. The application maybe installed from the Blackberry AppWorld, or from a Application Web Loader that installs the application via USB from the website, or from Over the Air in which case, a user navigates to a site and then installs the application from it.

Prerequisites


There are various requirements that must be met before an application can run in a Blackberry.
The application must be signed if it uses APIs that requires signing. Otherwise, the application will install in the device.

IT policies will need to be considered. For example, if the IT Policies do not allow running certain functions that the application is using, then the application cannot be used.

Also, the Trust Level of the application must be considered. The user or the administrator may disable certain permissions that might required to run the application.

Desktop Manager


The Desktop Manager is a software that allows a user to install a Blackberry application if they have a PC and a USB lead. The user will need COD and ALX files to be able to load the application. Eclipse automatically creates the COD files when the application is run or debugged. Eclipse automatically creates the ALX files when the application is packaged unless otherwise mentioned in the Blackberry_App_Descriptor.xml.


JAD, JAR and DEBUG files can also be found which might be useful.
To load the application on the device, start Desktop Manager, click on Application Loader and then click on Add / Remove Applications. Click on Browse and point to the ALX file and then follow the prompts.

Javaloader


Javaloader is a development purpose deployment method and should not be used to distribute applications. This tool requires a user to load the application using the command prompt. The user, therefore, will need to know the syntax to load the application.

Javaloader is part of the JDE kits and can be found in Blackberry JDE's bin folders.

Application Web Loader


Application Web Loader is the easiest way to load an application over the USB lead. The user does not need to know the command prompt functionality and nor does he need to install and use the Desktop Manager.
The user needs to go to the website, connects the device using USB lead, enter password if prompted and click on the Load button. The application will be loaded in the device. The JAD, COD and AxLoader cab files need to be on the web server. The mime type settings may need to be updated to allow the web server to publish the files to the site. The web server will need to associate web loader to the .jad file.

Over The Air


Using this method, a user can download and install an application from the web server wirelessly. Thus, Over The Air option allows easier and cheaper option to distribute the application.

The Blackberry browser can show the installation page and allow a user to download and install the application. The user can set permissions for the application.

The COD and JAD files need to be on the web server and the mime types on the server may need to be updated.

Blackberry Enterprise Server


Applications can be deployed to Blackberry devices automatically that are connected to Blackberry Enterprise Server. The Blackberry Enterprise Server administrator can log inn from any computer and easily deploy the application to specific users or groups. The administrator can also set the permissions of the application.

Blackberry App World


Blackberry App World offers opportunity to showcase an application to all Blackberry device users. Any developer can submit applications to the App World which will then be approved by RIM before making into the App World. Blackberry App World supports deploying applications running OS version 4.2.0 or higher.

Monday, May 24, 2010

Workshop 7 - Debugging Blackberry Application in Eclipse IDE

Debugging Tools:
There are different ways to troubleshoot a Blackberry application. The application can be debugged on the simulator while writing the application using Eclipse. In this example, I will debug an application that was written for previous tutorials.

To debug an application, click on the Debug menu item in the Debug menu or click F11. Choose Blackberry simulator if options come up and hit Ok.


The simulator may take a while before it starts working when the Debugger is attached. This will also open up the Console window as shown below.


On the top-right section, the Java button is selected. Clicking on the Debug button will show the Debug interface. The Debug interface is shown below.


Just below the Debug interface is the source code for the file. In this source code, we can set breakpoints as shown below.


Breakpoints allow the application to stop when it is run in the simulator at this particular point.
Below the source code, is the Console window that displays messages from JVM and also from the application. The Console window is helpful to debug application as we can display messages from the catch section of a try-catch block and print out the exception details if it is hit.

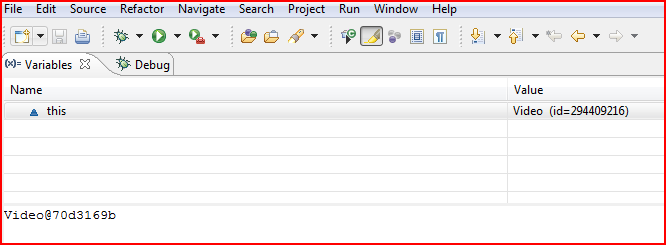
The Variables window appears next to the Debug window. When the application is run and hits the breakpoints, the variables are displayed in the Variables window as shown below.


The application can be resumed by clicking on the Resume (F8) option as shown below.


Blackberry Memory Statistics
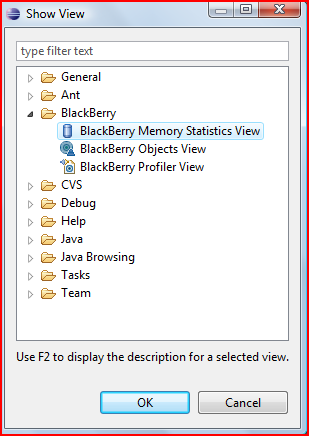
To set the memory statistics view, click on the Window > Show View > Other > Blackberry and choose Blackberry Memory Statistics View as shown below.


To use this, set a breakpoint and run the application. When the application pauses, click on the refresh button on the Blackberry Memory Statistics View. An example of the data is shown below.


Blackberry Objects View
This shows all the objects running from all the application. This can be viewed the same way as blackberry memory statistics by choosing the Blackberry Objects View. Typical data returned is shown below.


We can also the Garbage Collection function to check if the objects are properly deallocated.


Blackberry Profiler View
The Profiler displays information on where the application spends most of its time. It can be run same way as before by choosing the Blackberry Profiler View. Typical data returned is below.


Garbage Collection
Blackberry is Java based and it automatically frees up memory as necessary. Though garbage Collection can be called manually, Blackberry highly recommends against it.

Memory Leaks
Memory leaks can happen when the application maintains a reference to an object that is no longer needed. It can usually happen within the data structures, local variables, runtime stores and listeners. This can be very hard to detect but we can look for symptoms like the hourglass that appears as it performing garbage collection quite often.

Deadlocks
Deadlocks can happen when multiple threads are waiting for each other and hence the application gets blocked forever. The JVM can detect this issue and eventually end the application. On Blackberry, it is easy to identify a deadlock by having the “Interrupt debugger on potential deadlock” selected from the Run > Debug Configuration option as shown below.


While running the application, it will close the simulator and display the deadlock details in the Console window.

Setting up the simulator
We can modify simulator settings to work in different environments. For example, we may need to connect to a network using MDS or choose a specific model. We can change the settings by navigating to Run > Debug Configuration > Simulator as shown below.


Conclusion
Creating and debugging Blackberry applications in Eclipse IDE is quite easy as the application can be debugged and configured quite easily.

Sunday, May 23, 2010

WorkShop 6 - Playing Audio and Video

In this tutorial, I will create a Blackberry application to play audio and video files using the Mobile Media API (MMAPI).

Audio Playback
Classes from the javax.microedition.media package will be used to play audio on Blackberry devices. This package is compatible with the MMAPI.

Manager class

The Manager class is part of the javax.microedition.media package and is responsible from media handling. This class is needed to get access to the system resources such as the Player for multimedia processing. The Manager class can create a Player object and it can also query the player for specific details like supported media contents.

Content types

Content types identify the type of the media type and are registered as the mime types. Common audio types are audio/mpeg (for files with .mp3 extension) and audio/midi (for files with .midi extension).
We can use the method
public static String[] getSupportedProtocols(String content_type)

to find out which protocols specific content types support on the device we can use.


Playing Single Tone
To play a single tone, the following method can be used.
public static void playTone(int note, int duration, int volume) throws MediaException

where:
  • SEMITONE_CONST = 17.31234049066755 = 1/(ln(2^(1/12)))
  • note = ln(freq/8.176)*SEMITONE_CONST
  • The musical note A = MIDI note 69 (0x45) = 440 Hz
  • duration is note duration in milliseconds, and
  • volume is in range from 0 to 100.
Creating a Player

To create a player that plays audio files, the following method can be used.
PlayerManager.createPlayer(String url);
where the url is the location of the media file.

Player class

The Player class has a life-cycle consisting of 5 states – unrealized, realized, prefetched, started and closed. Once a Player is created, it is in the unrealized state. When it is created, it tries to connect to the audio file. When the system finds the source, the Player moves to the realized state. When the Player is ready to play the audio, it moves to the prefetched state. If the Player is started in this state, it enters the started state. From this state, the Player can either be moved to prefetched state or can be closed.

Audio Sample Application

In this example, I will create an application and play audio files from the Blackberry simulator. I will create a new project and call it AudioVideo, and add a new mp3 file as a resource. How the file is imported and the code to run the application is shown in the screen shots below.


When the application is run, the audio file starts playing and the list of supported media types are displayed as shown below.

Video Playback

Video files can be played in the application using the Manager and Player classes. Videos are larger in size and should be played from the SD Card.
Mobile devices have smaller screen and smaller files are sufficient to be played in mobile devices.

I have added a new class called Video.java to play the video file. The code for the class is below.

Note that, I am calling the video file from the SD Card. To set the SD Card, click on the Simulate menu, select change card and add the directory that contains the video file as shown below.


When the application is run, the video starts playing in the simulator.

Saturday, May 22, 2010

Workshop 5 - Network Transport

Overview
Blackberry device offers a a wide range of choices for creating an application that connects with servers and other systems on the internet or in the corporate network. Blackberry hides the details of the wireless network characteristics and let the developer concentrate on the core system.

Overview of Network Transports
Blackberry provides a number of different ways to connect to the network including the Blackberry Enterprise Server / Blackberry Mobile Data System (BES/MDS), TCP/IP, Blackberry Internet Service (BIS), WiFi, WAP 1.0 and WAP 2.0. All these methods may or may not be available depending on how the device is configured.

BES/MDS

BES allows Blackberry devices to make connections to corporate network. MDS component proxies the connection and can even connect to server that are behind the corporate firewall. This makes Blackberry a good choice to be used in the corporate world. On the other hand, since all connections is proxied by the MDS, the device can only connect to websites or servers that are allowed by BES server.

TCP/IP

Blackberry device can make direct connection to TCP/IP if permitted by the BES administrator.

BIS

BIS provide users the same functionality as for BES users but has lower lever of security. Devices connected to the BES servers are already connected to the BIS. BIS also provides the proxy connection similar to the BES/MDS but it does not allow connections to the corporate network.

WiFi

Many Blackberry devices include WiFi networking that allows connecting to a network via a WiFi router. Once the connection is made, the device can connect to network over the WiFi.

WAP 1.0, 1.1, 2.0

WAP is the standard carrier network available to blackberry. Devices connect to the cell towers and then to WAP gateway typically hosted by the carrier. The carrier Internet Web Servers.

MIDP Connection Framework

Blackberry uses the same connection framework as defined in the MIDP framework.

Connector

All connections are initiated using the javax.microedition.io.Connector class. The same class is used for HTTP, HTTPS, socket and many other connection types. For example, a HttpConnection can be opened using the followuing code.

HttpConnection connection = (HttpConnection)Connector.open("http://www.csu.edu.au/");
or
SocketConnection
socket = (SocketConnection)Connector.open("socket://www.csu.edu.au:80");

Connection Method:

When making a network connection, a device automatically try to connect using BES server. If BES is not available, the device will try to connect using TCP/IP. We can also specify how a device going to connect to the network.

To connect using TCP/IP, use the following code,

HttpConnection connection = (HttpConnection)Connector.
open(url + ";deviceside=true");

To connect using WiFi, use the following code,
HttpConnection connection = (HttpConnection)Connector.open(url +";interface=wifi");

To connect using BIS, the application will need to be approved by Blackberry Alliance Program.

Determining Network Availability
Using CoverageInfo
The net.rim.device.api.system.CoverageInfo class provides information on which connection methods are available to the blackberry device by checking the device's radio, current network coverage and service book. The main method providing the availability is the getCoverageStatus method. Different coverage values might be returned including the following:

  • COVERAGE_MDS means you can make connections using the BES/MDS connection method.

  • COVERAGE_DIRECT means you can make conections using direct TCP/IP or WAP.
  • COVERAGE_BIS_B means you can make connections using BIS.

Thursday, April 15, 2010

Workshop 4 - Storing persistent data

Storing Persistent Data

In a blackberry application, if an objects needs to be saved and then retrieved after the blackberry device is restarted, the object needs to implement the Persistable interface. In this workshop, I will create a blackberry project that saves data and then retrieve data from the application.

Note: Sub-classes of the class implementing Persistable interface do not automatically implement the interface.


Setting up a new project:

In previous workshops, I have shown how to create a Blackberry project using Eclipse. I will create another project "Bookstore" similarly and add a class called "Bookstore.java". The class will extend UiApplication and contain some EditFields, a java.util.Vector variable and a PersistentObject variable. The class will like below.


Menu Items:

I will add menu items to Save and Get item. The Save menu will save the data that is entered and display a success message. The Get menu will retrieve the data from the saved object and populates the EditFields. The codes for the menu items are shown below.


StoreInfo class:


The StoreInfo class implements the Persistable interface. The class declares a Vector variable and some constants. Constants are used to make sure that the data is read from and saved at the same location. The class also contains methods to set and get data from the Vector variable. The code for this class is shown below.


How persistence works:

The code to how persistence works is shown below.


As can be seen, persistence occurs by calling the getPersistentObject(long id) method. This method requires us to pass a unique id that is used to identify the persistent object. The setContents(Object obj) method is used to set the contents that will be saved in the device. The commit() method is called to save the object to the Blackberry device. Data can be retrieved from the device by calling the getContents() method (it returns an Object). In Eclipse, these methods are marked with a padlock. This means that the application has to be signed before it works - however, this will fine within the simulator.

Tuesday, April 13, 2010

Workshop 3 - Localization

Localizing an application really means to make it international. That is, the content of the application can appear in multiple languages. In blackberry, the net.rim.device.api.i18n package is used to enable localization.

For localized application, Blackberry automatically opens the application in the local language. For example, if the default locale settings are set to British English, the application will start up in British English if this Locale is available.

I will create a new Blackberry project as shown in the previous workshops and name it "Local". I have then added a file called Local.java. The class is shown below.


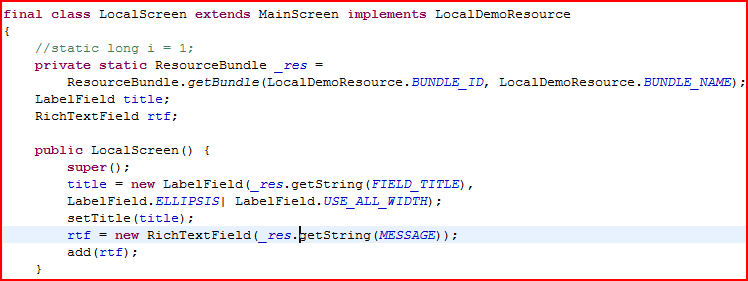
I have then added another class "LocalScreen". This class extends MainScreen and implements LocalDemoResource class. The LocalDemoResource class is relevant for setting up localization.


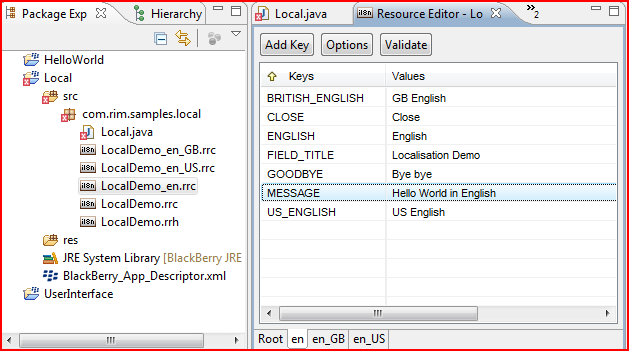
To add a new resource, create a new File of type Other and choose "Blackberry Resource File". The file is named as LocalDemo.rrh. The filename is important as the resource filename (not including extension) + "Resource" becomes the class name that the LocalScreen class implements. Then add keys to the .rrh file. To add contents to the resource files, edit the *.rrc file and add values for the keys to it. Add more .rrc files as needed to add more resources. The screen shots below shows how to add the resource files.


In this workshop, I have added 4 resource files in total and have added keys to resource files. The keys that are added can be called directly from the LocalScreen class.

Then I have added the code for creating the menu similar to the previous workshop, added a OnClose method to close the application and a refresh method to update values on the screen.

Then, running the applciation produced the following screen shots.


References:

Monday, April 12, 2010

Workshop 2 - Creating user interface and adding menu items

Blackberry UI API provides UI components that provide default layout and behaviours which are consistent with the core Blackberry device applications.


Setting Up a New Blackberry Project

In the previous workshop, I created a new project "HelloWorld". In this workshop, I will create a new project and add a new class "UserInterface" that extends UiApplication. The class is looking like below.


Then, another class "UserInterfaceScreen" is added that extends the MainScreen class.
 Variables of various types are declared. The class is looking like below.


Title

The title of the application is setup as shown below.


Managers

The screen is divided into three zones: top, middle and bottom. Horizontal and vertical managers are used to divide the application. The managers aligns up into rows or columns depending in their orientation. This is similar to setting up a components inside a JPanel class in a Java Swing application.

The managers are added in the order they will be displayed on the screen. A vertical manager is built-in on the screen. The code for setting up the managers is below.


Edit and Label Fields

Labels and Edit fields ae added to the middle manager. The code is shown below.


Buttons

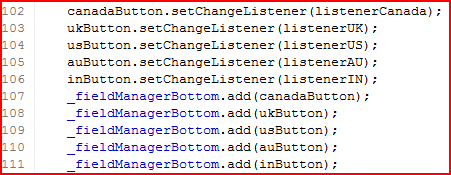
Five buttons have been added with different country names. FieldChangedListener is added to the buttons and the fieldChanged method is implemented.

This event performs action when a button is clicked. The code for creating the button and adding FieldChangeListener is shown below.


The buttons are then added to the FieldManager as shown below.


Menu Items

Two menu items are added to the menu - Close and Change Capital. Close shows a dialog as shown in workshop 1 and exits the application. Change Capital allows the user to edit the capital of the selected country. The method for adding menu items is shown below.


Running the application

When the application is run, the following screens are displayed.


As can be seen from the above screen shots of the simulator, the button for India did not appear and the text on Australia button is concatenated.This is because Blackberry screen does not have enough space to display the button in the same row and does not automatically add a new row.

Therefore, to solve this problem, a new FieldManager will need to be added with the buttons added in it.

References: 
http://na.blackberry.com/developers/resources/A11_User_Interface_V3.pdf